Drink and Draw in the East Village

So..... I decided to ditch my plans to go to your typical club themed social event this past Saturday night and instead opted to attend Alphabet City Sanctuary's "Adult Drink and Draw" with nude models and an open wine bar. Best decision I've made in a while!

I've done live model sketching before, but for me this was the first time some wine was added to the mix. Also, the models were nude, which isn't really that big a deal ....unless you're the model, I guess! I give 'em props for standing up there and doing what they do. It can't be easy...

Anyhow, I packed up one of my sketch pads, some loose sheets of paper, an assortment of pencils & some pastels and headed on down to the LES. Or the East Village, if you really prefer. Was a small room full of people intently and dedicatedly sketching a variety of models who rotated doing various poses. The models were great, and did I mention the open wine bar? I think I'll be doing this again. Here are my sketches that made the cut:


The Creative Process

    I've been spending much of my free time working on various things.  Since inspiration for a new piece springs out at me constantly, I've now amassed a collection of works in various states of completion.  It's hard to work the way I want with this job (and the rest of my life) constantly getting in the way!  Therefore, so many pieces stay unfinished for a long time.  I'm trying my best to catch up.

     What I'm working on right now: 


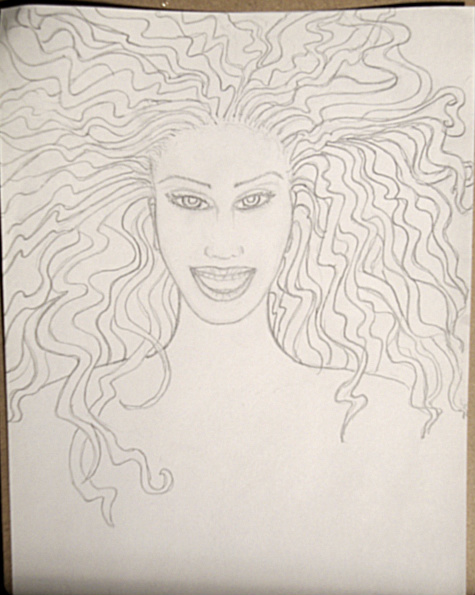
     Original drawing and stage one coloring.  Radical shift from the original, right?  But that was my plan.  She's black.... Just the skin and eyes here.  I've yet to fill in the lips, mouth and hair.  And whatever that is she's wearing....

     A bit lighter in this shot, simply because that's how the photo came out.  Her skin will be just as dark as the original in the finished product.  That hair is going to be quite a job to finish, though.  Took about an hour to do just that much, and I still need to throw some shading in there between the locks.  I dig these graves, but eventually do make it back out into the sunshine...with goodies!
     For fun, I did a digital edit before I even started on the hair.  Striking!  I will have to do two versions because the digital version is REALLY gonna pop and I can throw some fierce colors on it.  Love digital edits!!

   A lovely thing that's happening since I've started really tapping into my creative processes is that I'm improving on so many levels.  I'm starting to be able to draw better and faster.  What I envision now comes out onto the page much easier.  Woo hoo!  Gotta love that!  I am now excited to see what that all is going to lead to - how good at expressing my mind's pictures and thoughts am I really going to become?  I'm at a stage now where I'm truly happy with what I'm able to do, but realize that I still have much to learn.  So, as the guy (a distinguished illustrator) at the Society of Illustrator's said last month "Keep practicing.  Keep working on your craft.  No matter how good you become, there is always room for improvement and something else to learn."  I'm taking that advice to heart, and now not a day goes by when there is not a pen, colored pencil, marker, pastel, paint brush, lump of clay or piece of fabric in my hand.  Now, if I can only figure out how to  do it all full time..... and still pay the bills! :)


Beginnings of a Book....


Busy hands....  I gots 'em.

Drawing, designing, still experimenting with clay (more on that later).  Among it all, one of the projects that I have in mind is to write a tweens/teens book since I have a really good concept for one.  I began working on the characters.  This is my first one:  


I plan to name her Kai.  There are 3 characters in the book, Kai, Alisa and the last one I'm still trying to name.  After creating her, I began also trying to draw this same character in different poses/expressions.  Ish is mad hard to do!!  I will need to practice that, though, because your character really does have to look uniform throughout the illustrations in the book.

My attempts at uniformity:


Wellllll..... I need to keep working on it!  Practice, they say....

Now....here is a funny thing.  Sometimes I draw thinking I'm making one thing and it turns out I made something else without realizing it.  Kai is kind of a clone of me, somewhat.  I didn't realize it until I finished here.  She is definitely a take on THIS me:


For real, though,, right? lmao!  I guess since my face is the one that I see more than any other I drew myself (almost) without even knowing.  Gotta make sure not to do that with EVERY woman I draw!!

As I began working on this project I also started drawing a few backgrounds for the different scenes that the characters should be in, like the front stoop of one of the girls houses, etc.  I also began to research more into what it will take to get an illustrated book such as this published.  It won't have pictures on every page, but I do want to have some illustration in it.  What I learned through researching, though, is that when publishing houses accept and decide to print your book, they use their own in house illustrators!  Well, damn!  That screws up my whole plan!!  Part of the joy for me in writing the book is not just writing the story but also presenting my illustrations.  So  That.... Just..... SUCKS!!!  I also looked into self publishing and found that books that are illustrated are far more expensive to produce, especially those where the artwork is in color.  Hmpf.  Sooooo..... I gotta think this one out.  Maybe not do it in color?  I for sure don't want to do the book and have someone else illustrate it.  These characters need to look exactly the way I created them.  I know an in house illustrator is just gonna draw what THEY think and feel the characters should look like.  So... NOT... gonna.... happen here.  

I'm still going to work on this project, but not really urgently.  Still gotta make the other two girls, so I'm going to go ahead and do that.  Then, I'll see what path to try to take from there.  In the meantime, I have a ton of other projects that need to get done, so no worries!  Hopefully I'll end up making enough money from some of those to get the money to eventually produce this book myself!

Working With Clay -- My New, Hot Thing!!
  
So....  I see that it has been a long while since I posted something here!!  But guess what?  I've been busy working my little hands off.  Drawing, painting, sketching, learning to work with new media and tools, making clothing (as always) and now, I'm working on a few jewelry pieces.  Hence my new fascination with clay!

The only reason I have not posted any of my painted or drawn works here is that I can't get a good shot of them with my camera!!  I have tried different lighting, different rooms of my house and even have photographed a few things outside in the daylight, but the detailing still gets lost.  I'm tired of then trying to adjust the lighting of my drawings on a photo editor because that takes away from the basic integrity and originality of the piece. I'd rather not show it at all than to just show it in half its glory or edited. I have a really good mixed media drawing/painting that I did a couple months ago that totally loses its intended impact unless you can see all the textures I used, which won't pick up in photos.  But no worries... now I have found a good print shop in The Village that does scan everything, including art, so more of my stuff will soon be showing up here!  Yay!  I can't wait to show off my latest works!

In the meantime, I am trying to fill my Etsy store, and part of my inventory will be jewelry, which I am working on as we speak.  In working on the pieces for my collection, I am not just going the typical route by using store bought beads, charms and notions, etc to make my stuff.  Yes, I will use some of those elements to complement my pieces, but most of my parts are being made by hand by Moi (that's French for 'me').  I am using a variety of materials, some which will need a filler of some sort to give the jewelry parts some weight.  In trying to figure out what I could put inside a hollow jewel piece to achieve that, it came to me that I had bought some sculpting clay awhile back, intending to play around with it.  Well, VOILA!! -- there's my filler!!!  I began to work on the stencils and patterns for my pieces and then realized - hey!  Not only can I use clay as a filler, but I can also make some other parts for my jewelry pieces out of the clay!! - Duhhh....   Sometimes it takes a minute or two for the whole picture to pop in for me, but it always eventually does - ha!  So, I decided to experiment around with the clay and make a few pieces just to learn how to really work with this stuff successfully.  In the midst of this clay brainstorm I also remembered that I have cookie cutters.  Well, damn, there's nothing better to make precise clay figures with than a cookie cutter!  So, on I went on this little adventure...


The clay I used is a cheap polymer clay that is not meant for really serious work.  I found that out a minute too late, but this was a good learning experience nonetheless.  I used my cookie cutters to make stars and a penis.  Um, yeah... I have a penis cookie cutter.  Doesn't everyone?  :)  I actually have 3 in ascending sizes since they came in a set!  I took a heart pendant and traced it to make a heart charm.  Inside the heart I drew 3 smaller hearts and then cut out the hollows with an Exacto knife.  Above is my first batch of clay works, pre bake.  Below is the detailing on the first penis - I plan to paint it black and accent it in gold or silver, so I etched a design in ahead of time:


There's also a second penis, you say?!  Haaa!  Yeah, there is!  The one above came from the cookie cutter I had.  Well, after I made that one I was like "damn.  I know I can make a better penis than THAT!" So, I did!  And that second penis, ladies and gents, goes down in history as the first thing I've ever in life sculpted with my two hands.  No stencil, no pattern, no directions.  I just broke off clay, balled it up and made the parts, joining them together as I went.  And I'm damn proud of the result!   My first body part!  A penis!! Ha ha haaaa!  Here is the underside, so that you can appreciate the full 3 D-ness of it:


Yeah, it's tiny.  Well, what do you want, eh?  I won't go into whether or not I've actually seen one that size in real life - this ain't that kind of blog.  But man, if I told you.....  you would die! :D

So, after reading around online, I learned the proper temperature and amount of time needed to "fire" the clay to make the figures harden.  (no jokes on that, please... )  Here is the result:


WAAAAHHHHH!!!  What the hell?!  My larger penis shriveled and deflated!  HATE when that happens!! LOL!  But, yeah - for some reason the firing process - backfired here.  And my heart expanded. (insert another joke RIGHT there..! ;) )   The perfect, precise heart within a heart I made enlarged so the original design is kaput.  The other pieces came out fine, though.  They did harden, although the hollow star is a bit fragile.  I learned from this to double its thickness next time.  It's too thin to use for a jewelry piece or anything that I plan to sell because it will easily break.   However, I am pleased with this first attempt at making clay figures!  I will now troubleshoot and find out what I can do to make my 3 dimensional and larger pieces retain their shape.  One thing I already know I is that I need to use better clay.  I'll be using Sculpey clay next time, as I've since learned that that's the best.  I will also play around a bit with different baking times and temperatures for various pieces.  It's all a learning experience.  However, I am very proud of this first work, although it was not completely successful.

After doing this I got the bright idea to also make some clay beads, since some of my jewelry pieces will be having beads as accents and extenders.  Here are my first clay beads.  They look huge, but they're actually 3/4 inch wide and 3/8ths of an inch high:
  
Once again, I am pleased.  The beads came out of the oven decently hardened, so success on that one. I plan to be making a ton more beads now that I know how to do it.  The great thing about making your own base materials is that you can put your own unique designs on them.  I will also research on the best way to fire, glaze and finish all my future clay products.  I plan to use my drawing skills to decorate and design them my way.  Me and clay - it's ON!!  And I can't wait to see all the cool, new things I'm getting ready to make! It's gonna be fierce! :D


Art Imitates Life - Me on the Mountain Top
 
Acrylic on heavy weight paper..... This is actually a BAD pic of an okay painting I just did.  Since I've been hiking and mountain climbing I've been wanting to paint nature scenes.  Learning how to do mountains and the surrounding scenery is a challenge, yet it is fun! So many textures to play with and try to recreate.  Still working on that.... ;)   This pic was taken in some poor lighting so I used the flash.  Funny thing though, the flash makes the water in the painting look wet!  I will probably scan this one and re post it later, though.  This pic does not really bring it all through....   And yeah, that's ME up there on the mountain, facing the sun..... ;)  


Warrior 1


     I have to title this "warrior 1" since it's my first warrior posted online.  I'm always drawing warriors, avengers and fighters, so in reality, this is probably warrior # 39 or something. ;)  At any rate, I couldn't get a good photo of this drawing even though I took it out in the daylight.  I really need to get a scanner because the photos sometimes don't show the complete detail of the drawing, and damn, I work hard on those little details.  

     This is how the raw drawing looks before I color it in.  She is on a path in the wooded mountains by a small lake.   Therefore, there will be lots of greens, browns, greys and some blues for the water and sky.  I'll post the finished product eventually.  I actually started this drawing about 4 months ago and put it down. It's just been languishing around in my sketchbook all this time, among other drawings I started and never finished.  I once started a drawing and didn't come back to finish it until 6 years later.  But it's done now! ;) For some reason, I was in the mood to finish this warrior today.  Yay!  Now, on to my 20 or so other unfinished drawings... one down, a slew more to go..... :)


So, I was challenged to draw a fat cat. Well, here it is...about as fat as I could make it! ;)


It's certainly not my best work of late, but it was cool to just draw something on demand.


Here is a before and after - the raw black and white drawing and the colored in version.  

 My only peeve is that I should have used a lighter green for the cat's iris so that it would be more visible .... it looks like the entire inner eye is the same color.....


Found this cool pic to edit, embellish and turn into my own, personal Happy New Year 2012 card. This is the original...


And here is the result.  I was going to do a bit more to it, but for some reason the photo editor and my computer were busy having many disagreements and arguments over really simple things (hate when that happens!), so I stopped.  However, as it turns out, less is more.  Happy New Year! ;)


My "Day" Job....


.....another form of art if you know what you're doing! ;)


Back at it, and this time I am working on a butterfly, fairy woman..... entity.  lol!  Anyway, she's a fairy, I guess.  I drew it in pencil and I just finished it off in fine tipped black pen.  Since I draw things on the spur of the moment and so randomly, usually on the train, I sometimes end up putting something really good on a piece of notebook paper.  That's what happened here.  Now, I have to get rid of those lines. I attempted that by doing a white out of the lines with white acrylic paint.  Let it dry, and then I took a photo of it.  Here is the piece after phase one (draw and basic hand edit):


I will now do a digitally edited version of this, the raw black and white original of the drawing. I plan to color it in later, but at this point, I think I can do something really interesting with just the black and white. Here is how that edit went:


Pretty cool, huh? I was able to clean up the background and create kind of a snowy background effect. This is not the final product, but I love playing with a piece through the different stages of creating it. Anything I draw in black and white, I make sure to photo before coloring it in, and then I try to see what I can make out of it. Sometimes it's good, sometimes... well, you know. ;)
I will come back and post the final, colored one. I actually did it last night, using gel pens and a bit of paint. Came out awesome! I need to photo it, and when I do, you'll get to see what I did. Be back soon! ;)